Save Standard Detail ( Drawing Editor > s s )

Tool summary :

  • Lets you copy an area of your current drawing and save it to a job standard detail file that you name.
  • All visible objects (on layers marked " Show ") that are within the area that you designate will be copied. The copied objects will occupy a single layer in the job standard detail . Your current drawing is not affected by Save Standard Detail .
  • Use Save Standard Detail together with Add Standard Detail to "cut & paste" parts of one Drawing Editor drawing into another.
  • See (on this page):

Also see :

page 1 | contents | edit > | edit -- area mode


   Quick instructions (also see the detailed instructions ) :

1 . Invoke Save Standard Detail .

2 . Hold down the left mouse button ( Locate ) to draw an area box that establishes the clipping limits for 3D materials and other polygons.

3 . Adjust the selection. In this example, the Ctrl key is held down and left-click ( Select - ) is used to deselect material lines inside the clipping limits. Right-click ( OK ) is used when adjusting the selection is done.

4 . The highlighted items preview the job standard detail. Left-click ( Locate ) a reference point to be used as the insertion point for the job standard detail.

5 . On the Name Required window, give the standard detail a file name.

6 . On the Area Save window, optionally enter a description, etc.

Save Standard Detail creates a job standard detail . It does not alter your current drawing. At left is the job standard detail created in the above example.

page 1 | contents | edit > | edit -- area mode | top


   Detailed instructions (also see the quick instructions ) :

The highlighting in step 5 previews what the job standard detail will look like. Set Selection Filters can be used during a Save Standard Detail operation -- see step 3 and step 4 . Be aware that polygons ( 3D materials , 3D bolts , 3D holes & clouds ) that are only partially within the clipping limits that you set in step 3 will be clipped.

Before using this tool, you may want to:

  • If the drawing is a member detail, you should Unshorten it.
  • Set selection filters for the types of objects that you want to save. For example, if you want to save only dimensions, select the ' Dimensions ' selection filter. Alternative: You can change the selection filters in step 3 and/or step 4 .
  • Using the right selection filter lets you save polygons . If you Save Standard Detail with the selection filter set to ' Default ' (which does not let you select polygons), the polygons are converted to lines in the job standard detail that is saved. However, if you set the filter to ' All ' or ' Polygons ' then Save Standard Detail , the polygons are saved as polygons.
  • Layer Edit All and check the " Show " boxes for those layers that you want acted on.

1 . Invoke Save Standard Detail using any one (1) of the following methods:

Method 1 : Click the Save Standard Detail icon. The icon can be taken from the group named ' Edit -- Area Mode ' and placed on a toolbar (classic) or the ribbon (lightning).

Method 2 : If " Drawing Editor layout style " is ' Classic ', you can use the menu system to choose Edit > Save Standard Detail .

Method 3, 4 or 5 : Save Standard Detail can also be invoked using a keyboard shortcut ( s s ), the context menu , or a mode . For the ' Lightning ' layout style, configuration of the interface is done using Customize Interface .

Method 6 : With Area Mode mouse bindings active, hold down the Shift key and left-click ( Save ).

2 . Skip this step if it does not apply. If you are in a detail that has been Shortened , a warning dialog appears with the following message: " Continuing without unshortening will remove the ability to unshorten the resulting detail ." Do one (1) of the following:

Alternative 1 : Press the " Unshorten " button to Unshortened your current drawing. You can later Open the job standard detail that you subsequently create (in steps 3 - 8) and Shorten that drawing.

Alternative 2 : Press the " Continue " button if you do not want to Unshorten your current drawing. The job standard detail that you create (in steps 3 - 8) cannot be Shortened at a later time. Go to step 3.

Alternative 3 : Press the " Cancel " button to end this operation and keep everything as it was before step 1. Do not continue.

3 . Locate - Pan - Return mouse bindings become active. The status line prompts, " Locate area clip bounds ." This step sets the clipping limits for 3D materials , 3D bolts , 3D holes & clouds . Tip: You can Set Selection Filters before setting the clipping limits.

bindings

3a : Define an area box by dragging your mouse pointer ( ) while holding down the left mouse button ( Locate ). Be aware that 3D materials, 3D bolts, 3D holes & clouds that are only partially within the clipping limits will be clipped. For left-to-right selection by area box, other objects (such as dimensions) must be entirely within the area box in order to be selected in this step. For right-to-left selection, any part of these other objects that are in the area box are selected.

4 . Select - Pan - Menu mouse bindings become active. A dotted rectangle shows the clipping limits you set in step 3. Also, all objects you selected in the previous step are highlighted. The status line prompts, " Adjust selection ."

bindings

4a (optional) : Skip step 4b if the currently selected objects are the objects that you want to be saved into the job standard detail.

4b (optional) : Hold down the Shift key and Select + to select additional Drawing Editor object(s) that you want included in the job standard detail. Or you can draw an area box . To deselect objects, hold down the Ctrl key and left-click ( Select- ) the selected objects.You cannot select 3D materials , 3D bolts , 3D holes or clouds that are outside the clipping limits. You can Set Selection Filters when adjusting the selection.

4c : When the objects that you want included in the to-be-saved standard detail are selected, press the Enter key (or right-click ( Menu ) and choose " OK " on the context menu ). Go to step 5.

5 . You are shown a preview of what the standard detail will look like. Only those objects or parts of objects that are currently highlighted will be included in the job standard detail. The status line prompts, " Locate a reference point ." Various Locate options and Locate- Pan -Return mouse bindings become active.

bindings

The reference point is used as the insertion point for the job standard detail when it is imported into other drawings using Add Standard Detail . If you later find that you want to relocate this point, use Verify Reference Point .

Alternative 1 : Place your mouse pointer ( ) so that the point location target snaps to the point on the drawing that you want to be the reference point, then left-click ( Locate ). Go to step 6.

Alternative 2 : Right-click ( Return ) to end the Save Standard Detail operation without creating a new job standard detail. Do not continue.

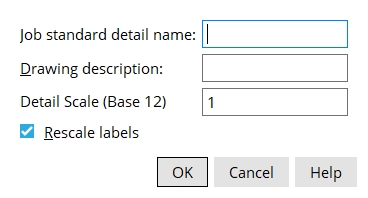
6 . The Name Required window opens.

Alternative 1 : To " Standard Detail name ," type in the file name (up to 61 characters) that you want to give the job standard detail, then press the " OK " button. Go to step 7.

Alternative 2 : Press " Cancel " (or the Esc key or the button) to end the Save Standard Detail operation without creating a new job standard detail. Do not continue.

7 . The Area Save window opens.

Detail description: The description (up to 22 characters) you want to appear as the " Material description " on the Drawing Data window for the job standard detail you are creating.

Detail scale (Base 12 or 10) : The default scale shown here is the scale of your current drawing. (Base 12) indicates the scale is in imperial units (X inch = one foot). (Base 10) indicates the scale is in metric units (X mm = 10 mm). Changing the scale causes all graphic elements (except labels if the box for " Rescale labels " is checked) to automatically be resized.

Rescale labels: Applies when a new " Detail scale " has been entered. If this box is checked ( ), labels on the job standard detail are resized per the new " Detail scale " that was entered above. If the box is not checked ( ), the labels retain their current scale.

Alternative 1 : Press the " OK " button to close the window and save the job standard detail. Go on to step 8.

Alternative 2 : Press " Cancel " (or the Esc key or the button) to end the Save Standard Detail operation without saving the job standard detail. Do not continue.

8 . The mouse bindings that were active before you invoked Save Standard Detail become active again. Your current drawing is totally unaffected by your having used this tool (unless you Unshortened in step 2).

Tip: You can now, if you so choose, Open ( Ctrl + o ) the new job standard detail you just created. The new job standard detail has the file name you entered in step 6.

page 1 | contents | edit > | edit -- area mode | top